Note
Some functionalities are only available if you are using a DMS. The availability of these functions is also dependent on DMS interface version and implementation.
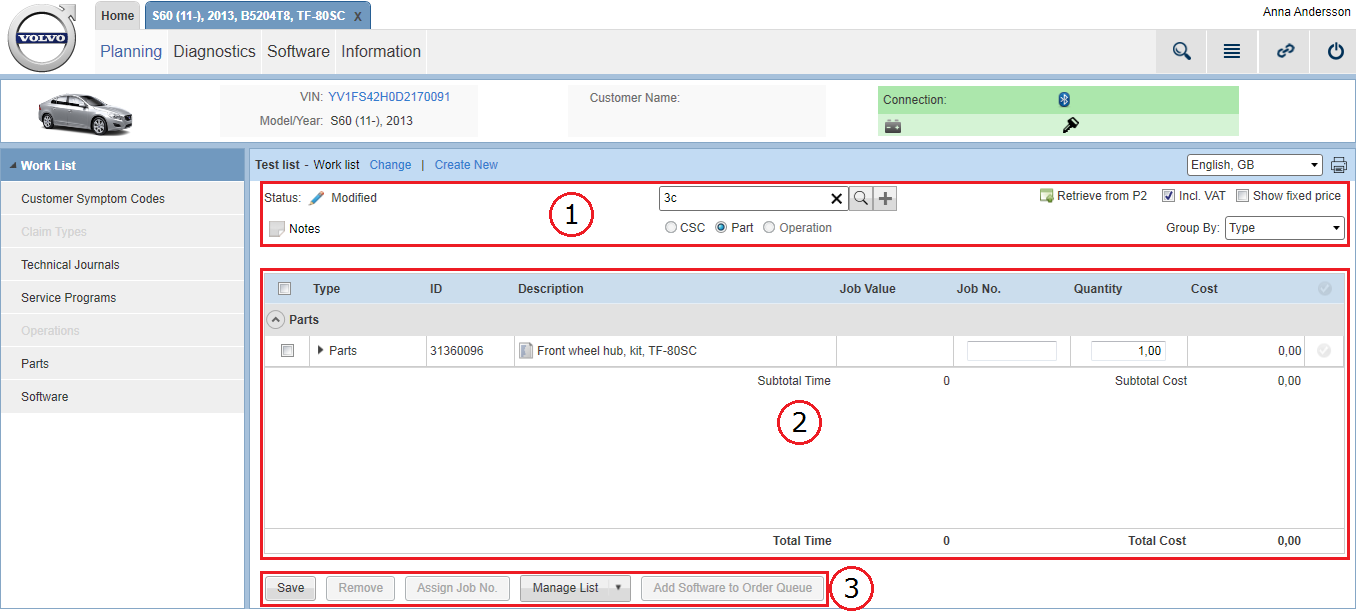
The parts list view shows detailed information about a selected parts list. A parts list is never connected to a specific vehicle profile. In contrast to a work list, which can have different types of items added to it, a parts list only consist of parts.
The primary functionality here is basically to search and add or remove parts in a parts list. You can also change the quantity of added parts and retrieve price information and other details if a DMS is available.
The parts list view has three main sections:
Note
Note
Some functionalities are only available if you are using a DMS. The availability of these functions is also dependent on DMS interface version and implementation.
When creating a new parts list, an empty list is shown. Populate and manage a parts list by using the functions described in the sections below.
The following functions are available in the upper section of the parts list view:
|
Function |
Description |
|
|---|---|---|
|
|
Click this button to open the List repository view to select another list to work with. |
|
|
|
Clicking this button activates a pop-up window from which you can create a new list. Select what type of list to create and enter a list name. An order number for the list can be entered as well. By clicking the button, the list is created and opened. See the how-to article Creating a new work list or part list for further instructions. |
|
|
|
By using the print functionality you can print the parts list or the service checklist. Select what to print from the drop-down
menu and click the |
|
|
Status |
A parts list always has a certain status. Some statuses are set by VIDA at certain occurrences whilst some statuses can also be modified by users working with the list. Click the |
|
|
Status: |
Description: |
|
|
Open |
Automatically set when a parts list is created. |
|
|
Retrieved |
Automatically set when a parts list is retrieved from DMS. |
|
|
Complete |
Automatically set once you have marked every row in the parts list as completed. See table in section 2 for additional information. This status can also be set manually. |
|
|
Modified |
Automatically set if you make any changes on a parts list with status Complete or Retrieved. This status can also be set manually. |
|
|
Planned |
Manually set once you decide the planning is completed. |
|
|
Search/Quick Add |
By using this function, you can search and add items to your parts list. Use the If you are aware of the number of the part you want to add, use the |
|
|
|
If a DMS is available, a work order can be retrieved from the DMS and added to the parts list. Information about price, stock quantity and stock location for each part in the parts list can be retrieved from the DMS as well. For further instructions, see the how-to article Importing work order from DMS. |
|
|
Incl. VAT |
Tick this box to include VAT for prices. |
|
|
Show fixed price |
Tick this box to view fixed prices. |
|
|
Notes |
Click the |
|
|
Group By |
Regardless of what you select from this drop-down menu, parts lists can only be grouped by Job No.. The other options only apply for work lists, meaning you can ignore the other options when working with parts lists. |
|
Note
Note
The Retrieve from 'DMS', Incl. VAT and Show fixed price options are only available if you are using a DMS. The availability of these functions is also dependent on DMS interface version and implementation.
The content of a parts list can only be grouped by Job No. (see the table above for further information).
All items in a parts list are ordered in columns. See the table below for a description of each column.
|
Column |
Description |
|---|---|
|
Type |
Type of the parts list item. Since a parts list cannot contain anything other than parts, you will not see anything other than parts here. |
|
ID |
The part's number. |
|
Description |
Short description of the part. The |
|
Job Value |
Time required to perform a specific operation. For general operations there is no predefined job value. In these cases an input field is available so that the job value can be entered manually. Subtotal time is displayed below each group of parts in the parts list. The total time for all groups of items is summarized in the lower part of the parts list below all groups of items. |
|
Job No. |
Input fields to assign job number. |
|
Quantity |
Input fields to modify the quantity of parts in the list. |
|
Labour Cost |
Displays the price for parts in the list. Subtotal cost is displayed below each group of parts in the parts list. The total cost for all groups of parts is summarized in the lower part of the list below all groups of items. |
|
|
By using these icons, rows in a parts list can be marked as completed. This is to help you to keep track of what has been
done and what is left to be done in your lists. When clicked the icon turns green |
The details of each part are hidden by default. Use the  icon or double click to expand the part item to view the details. The details are hidden again by clicking the icon once
more.
icon or double click to expand the part item to view the details. The details are hidden again by clicking the icon once
more.
The table below presents the information and functions that are available in the part details.
|
Part Details |
Description |
|---|---|
|
Price/unit incl. VAT |
Price per unit including value added tax. |
|
Price/unit excl. VAT |
Price per unit excluding value added tax. |
|
Stock Quantity |
Information about stock quantity fetched from DMS. |
|
Stock Location |
Information about stock location fetched from DMS. |
|
Add Comments |
In this text field you can enter and save your own comments for a specific part in the list. Please note that the comment is saved for the current parts list only. |
The following buttons are available in the lower section of the parts list view:
|
button |
Description |
|
|---|---|---|
|
|
Click to save changes in the current parts list. |
|
|
|
Click to remove one or more selected parts from the list. Select part(s) to remove by using the checkboxes on the left-hand side of each row. |
|
|
|
Click to assign a specific job number to one or more parts. Select part(s) to assign a job number by using the checkboxes on the left-hand side of each row. |
|
|
|
Click to submit the current parts list to your DMS. A pop-up window will appear in which you will need to select whether to add the list to an existing order or to create a new one. A number of fields are available to fill in details of the work order before clicking the button. When a parts list is sent to the DMS it will no longer be available in VIDA for modification. For further instructions, see the how-to article Sending a work list or parts list to DMS. |
|
|
|
In this menu, the following additional functions for managing the parts list are located: |
|
|
Function: |
Description: |
|
|
|
Activates a pop-up window from which you can edit the details of the list information, i.e. type, name and order number. |
|
|
|
Activates a pop-up window from which you can import a saved parts list in |
|
|
|
Activates a pop-up window from which you can export the current parts list as a |
|
|
|
Deletes selected items in the list. If no items are selected the list will be deleted. |
|
|
|
Takes you to the List repository view where you can select another list to work with. |
|
|
|
Activates a pop-up window from which you can create a new list. Select what type of list to create and enter a list name. An order number for the list can be entered as well. By clicking the button, the list is created and opened. See the how-to article Creating a new work list or part list for further instructions. |
|
|
|
Click this button to add a selected software part in your list to order queue. The main Software tab is opened where you can complete the action. |
|
Note
Note
The Submit to 'DMS' option is only available if you are using a DMS. The availability of these functions is also dependent on DMS interface version and implementation.
 icon. A print preview is shown in a pop-up.
 icon to modify a parts list's status. The following statuses are available:
 button to perform a search. The search results is presented in another view, see the article
  button. This adds the part to the list instantly.
 icon to add a note to the parts list. Notes are useful to quickly capture customer inputs or other memos that need to be
stored with the list. Once you have written a note, the icon turns yellow
icon to add a note to the parts list. Notes are useful to quickly capture customer inputs or other memos that need to be
stored with the list. Once you have written a note, the icon turns yellow  to indicate that a note is attached to the list. Please note that comments are not sent to
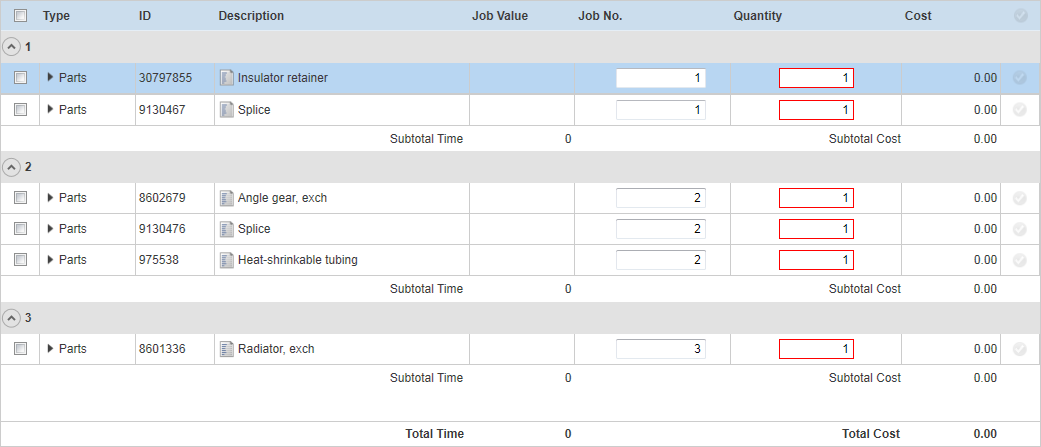
 icon indicates that there is a reference document available. Click the icon to open the document.

 . This indicates that the row is completed.
